Showing posts with label PyQGIS. Show all posts

Thursday, August 31, 2017

Calculate the centroid of a polygon with python


In this post I will show a way to calculate the centroid of a non-self-intersecting closed polygon.

I used the following formulas,

C_{\mathrm {x} }={\frac {1}{6A}}\sum _{i=0}^{n-1}(x_{i}+x_{i+1})(x_{i}\ y_{i+1}-x_{i+1}\ y_{i})

C_{\mathrm {y} }={\frac {1}{6A}}\sum _{i=0}^{n-1}(y_{i}+y_{i+1})(x_{i}\ y_{i+1}-x_{i+1}\ y_{i})

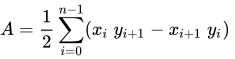
A={\frac {1}{2}}\sum _{i=0}^{n-1}(x_{i}\ y_{i+1}-x_{i+1}\ y_{i})\;

as shown in https://en.wikipedia.org/wiki/Centroid#Centroid_of_a_polygon .

In the following code, the function receives the coordinates as a list of lists or as a list of tuples.

from math import sqrt

def centroid(lstP):
    sumCx = 0
    sumCy = 0
    sumAc= 0
    for i in range(len(lstP)-1):
        cX = (lstP[i][0]+lstP[i+1][0])*(lstP[i][0]*lstP[i+1][1]-lstP[i+1][0]*lstP[i][1])
        cY = (lstP[i][1]+lstP[i+1][1])*(lstP[i][0]*lstP[i+1][1]-lstP[i+1][0]*lstP[i][1])
        pA = (lstP[i][0]*lstP[i+1][1])-(lstP[i+1][0]*lstP[i][1])
        sumCx+=cX
        sumCy+=cY
        sumAc+=pA
        print cX,cY,pA
    ar = sumAc/2.0
    print ar
    centr = ((1.0/(6.0*ar))*sumCx,(1.0/(6.0*ar))*sumCy)
    return centr

Thursday, March 30, 2017

Using clipboard in PyQt

You can use the clipboard in your PyQt plugins by using the QApplication.clipboard().
First you import qthe QApplication from PyQt4.QtGui.

from PyQt4.QtGui import QApplication

Then you can create a variable, for example:

self.clip = QApplication.clipboard()

And then set some text to it:

self.clip.setText('some text')


Friday, February 17, 2017

PyQGIS - Screen Capture as Image with coordinates


To capture the current screen extents, including a world file, use this command in PyQGIS:

qgis.utils.iface.mapCanvas().saveAsImage(fileName)

where 'fileName' is que path and fileName you want. It will be a .PNG file

Then, you can use some more code to get this fileName from a Open File Window, as below.

from PyQt4.QtGui import QFileDialog

projP = QgsProject.instance().readPath("./")
fileN =QFileDialog.getSaveFileName(None, "Save Image as:",projP,"Image Files (*.png)")
print 'file=',fileN
if fileN!='':
    qgis.utils.iface.mapCanvas().saveAsImage(fileN)


Thursday, November 17, 2016

Drawing Coordinates as Line in QGIS - PyQGIS

In this post I'll show some code for drawing a line from a list of coordinates, and saving it in a temporary vector layer.

You can implement the code below to get the coordinates from a text file, clipboard, or any user input.

Below are two functions that, called with the layer name and list of points as arguments, build a Line or Point temporary layer.

+1 / share if you like the post and the blog!

-----------


def createLineLay(name,lstP):
    vl = QgsVectorLayer("Linestring", name, "memory")
    #pr = vl.dataProvider()
    vl.startEditing()
    vl.addAttribute(QgsField("id", QVariant.Int))
    vl.updateFields()
    fet = QgsFeature(vl.pendingFields())
    lstPP = []
    for p in lstP:
        lstPP.append(QgsPoint(float(p[0]),float(p[1])))
    lstPP.append(QgsPoint(float(lstP[0][0]),float(lstP[0][1])))
    fet.setGeometry(QgsGeometry.fromPolyline(lstPP))
    fields = vl.pendingFields()
    fet.setFields( fields, True )
    fet['id'] = 0
    pr = vl.dataProvider()
    pr.addFeatures( [ fet ] )
    vl.commitChanges()
    QgsMapLayerRegistry.instance().addMapLayer(vl)    

def createLayPts(name, lstP):
    vl = QgsVectorLayer("Point", name, "memory")
    #pr = vl.dataProvider()
    vl.startEditing()
    vl.addAttribute(QgsField("ID", QVariant.Int))
    vl.addAttribute(QgsField("X", QVariant.Double))
    vl.addAttribute(QgsField("Y", QVariant.Double))
    vl.updateFields()
    idP = 0
    for p in lstP:
        fet = QgsFeature(vl.pendingFields())
        fet.setGeometry(QgsGeometry.fromPoint(QgsPoint(float(p[0]),float(p[1]))))
        fields = vl.pendingFields()
        fet.setFields( fields, True )
        fet["ID"] = idP
        fet['X'] = p[0]
        fet['Y'] = p[1]
        pr = vl.dataProvider()
        pr.addFeatures( [ fet ] )
        vl.commitChanges()
        idP +=1
    QgsMapLayerRegistry.instance().addMapLayer(vl)

Wednesday, October 26, 2016

How to know if the polyline direction is clockwise or counter-clockwise?


I found myself puzzled with this question today, when dealing with closed lines today. I thought I could deal with this summing the horizontal deflections, but not every polygon works with this solution.
Then I found this interesting answer: 

http://stackoverflow.com/questions/1165647/how-to-determine-if-a-list-of-polygon-points-are-in-clockwise-order

The answer: you have to sum over the edges, (x2 − x1)*(y2 + y1). If the result is positive the curve is clockwise, if it's negative the curve is counter-clockwise. (The result is twice the enclosed area, with a +/- convention.)

If we have a list of tuples (x,y) representing point coordinates, named lstP:
lstEdge = []
for i in range(len(lstP)-1):
    lstEdge.append((lstP[i+1][0]-lstP[i][0])*(lstP[i+1][1]+lstP[i][1]))
result = sum(lstEdge)
if result>0:
   print "Clockwise"
else:
   print "Counter-Clockwise"


Wednesday, November 25, 2015

Plotting Charts with PyQGIS

In this post, I will show an example of how to plot a simple line graph in PyQGIS, with matplotlib library. This library is already included in PyQGIS.

The example code is below.

import matplotlib.pyplot as plt


# x and y data as same length lists

radius = [1.0, 2.0, 3.0, 4.0, 5.0, 6.0]

area = [3.14159, 12.56636, 28.27431, 50.26544, 78.53975, 113.09724]


plt.plot(radius, area)

plt.xlabel('Radius')

plt.ylabel('Area')

plt.title('Area of a Circle')

# show grid lines

ax = plt.axes()

ax.grid(True)

# show plot window

plt.show()

Wednesday, November 11, 2015

How to use active layer in QGIS python - PyQGIS

Just use the activeLayer() as in the following code.


mylayer = qgis.utils.iface.activeLayer()
print mylayer.name(), " - ",mylayer

Monday, November 9, 2015

Step by Step - Making QGIS Python Plugins

Plugin QGIS

1. Download Plugin Builder

2. Fill in all fields. Pay attention to the tips shown when you put the mouse pointer over the field.


3. After finishing, choose the folder where the plugin folder will be created.

4. Open QTDESIGNER. It is included with QGIS. Filename is "designer.exe";

5. Make the Graphical Layout of your plugin, and save it;

6. In QGIS: Download the plugin named "PLUGIN RELOAD" - as it is experimental, you have to set your QGIS to list experimental plugins;

7. Edit your source code to do whatever you want - edit the code named “YOURPLUGINNAME”.py

8. After you finish any modifications in your graphical layout or source code, save it, and then execute the PLUGIN RELOAD plugin.

9. Your Plugin is ready.

Friday, November 6, 2015

Installing pip in PyQGIS

"pip" is a package management system used to install and manage software packages written in Python. Many packages can be found in the Python Package Index (PyPI).

Many modules are installed through "pip", so as the SWMM5 module.

Installing pip in QGIS - python - PyQgis - OSGeo4w

1 - Download pip - https://bootstrap.pypa.io/get-pip.py ;
2 - Open OSGeo4W;
3 - go to the get-pip.py folder and type:
python get-pip.py

Wednesday, November 4, 2015

How to Install New Python Modules / Packages in QGIS - method #1


Steps:


1 - copy source folder to C:\Program Files\QGIS Wien\apps\Python27\Lib\site-packages

2 - Open OSGeo4W Shell; go to unpacked folder, where setup.py lies - (>> cd "C:\Program Files\QGIS Wien\apps\Python27\Lib\site-packages")

3 - Type: >> python setup.py install


-----


If it shows errors regarding setuptools: you will have to install setuptools.


https://pypi.python.org/packages/source/s/setuptools/setuptools-18.4.zip#md5=38d5cd321ca9de2cdb1dafcac4cb7007


Download setuptools package, then repeat the same steps for installation.

Ps: in my opinion, this is the worst method to install modules. Next post I will tell how to use "pip" with QGIS Python.


Monday, November 2, 2015

"Hello World" in QGIS python

Steps:

1 - open code editor as described in last post
2 - copy following code in python editor window:

print 'HELLO WORLD!'

3 - press the save script button - and save it in a proper folder;
Save Button Location

4 - press the 'Run Script' Button;

Run Script Location


5 - See the result in the Console.

Result


Please leave comments and opinions.